Somebody asks me this at the club forge about once a month: what can I use as an anvil until I can afford a real one? Anvil alternatives are a real subject and not a consolation prize, but they cover an enormous range. At one end is a piece of railroad rail that will honestly carry you through your first year of forging. At the other is a painted cast doorstop that swallows every hammer blow, chips at the edge, and teaches you nothing except bad habits. The difference between the two is not price and it is not shape. It comes down to mass under the hammer and hardness at the surface, and you can judge both with a ball bearing and a ruler. This page is a reference, not a shopping list. I want you to be able to walk into a scrap yard and know what will forge.
I started self taught on a cut length of railroad track clamped to a stump, and I made every beginner mistake worth making on it. It worked, up to a point, and the place where it stopped working is the useful part of the story. Bessie, my 148 lb Trenton, does things that track never could, but the track carried me to the day I could tell the difference. That is the entire job of an improvised anvil.
What an anvil actually does for you
An anvil has two jobs. Everything else on it is convenience.
The first job is putting mass directly under the hammer blow. When you strike hot steel, the energy either moves the metal or moves the anvil. A heavy, well supported mass under the work does not move, so the steel does. This is why weight matters so much more than footprint, and why a thin plate the size of a dinner tray is worse than a solid block the size of a coffee mug. I go into the sizing question properly in the anvil weight guide, and the same logic decides every improvised anvil you will ever pick up.
The second job is returning energy. A hard face bounces the hammer back at you instead of absorbing the blow, so you get more work per swing and less work per elbow. A soft face eats the energy, dents, and leaves you tired with a bar that has barely moved.
Everything else, the horn, the pritchel hole, the hardy hole, the step, is a fixture that makes certain operations easier. They are worth having and you will miss them, but you can forge without them. You cannot forge without mass and hardness. When you are judging anvil alternatives, judge those two first and let the missing horn be a problem for later.
The rebound test settles most arguments
There is a test for the hardness half, and it costs about what a ball bearing costs. anvilfire publishes it on their Anvils-5 Testing Rebound page, and it is the one measurement I trust on a piece of steel I have never seen before.
You take a steel ball bearing between 1/2 inch and 1 inch in diameter, hold it 10 inches above the face, and drop it. Drop, not throw. Then you read how high it comes back as a fraction of that 10 inches. anvilfire's line is that on a really hard anvil the ball will bounce about 75 to 90 percent of the distance dropped. That is the range worth quoting, and I am not going to invent a different site standard on top of it.
The interesting part is what they measured with a 1 inch ball from a 10 inch drop. A Peddinghaus 165 lb forged steel anvil came back 93 percent. High quality wrought anvils, Hay-Budden and Peter Wright, averaged 80 to 85 percent. A short section of modern 150 lb railroad rail returned 50 percent. Annealed SAE 4140 gave 25 percent, and A-36 structural steel plate 8 inches thick gave 20 percent. Smooth aged concrete came in at 15 percent. Imported cast iron anvil shaped objects and doorstops returned 10 percent. A red oak log on the endgrain gave 5 percent.
Carry their caveats with the numbers, because they matter. anvilfire notes that materials below 30 percent rebound were visibly marked by the ball, which tells you those surfaces are being dented by a bearing dropped less than a foot. They also say plainly that these are not scientific results, and that rebound is a good indication of hardness but not always a perfect indication. It is a screening test. It is a very good one.
Run it on anything before you commit a season of practice to it. If a candidate reads lower than the concrete floor it is standing on, you have your answer.
The railroad track anvil, and why it has to stand on end
The railroad track anvil is the classic first anvil, and most people set it up wrong.
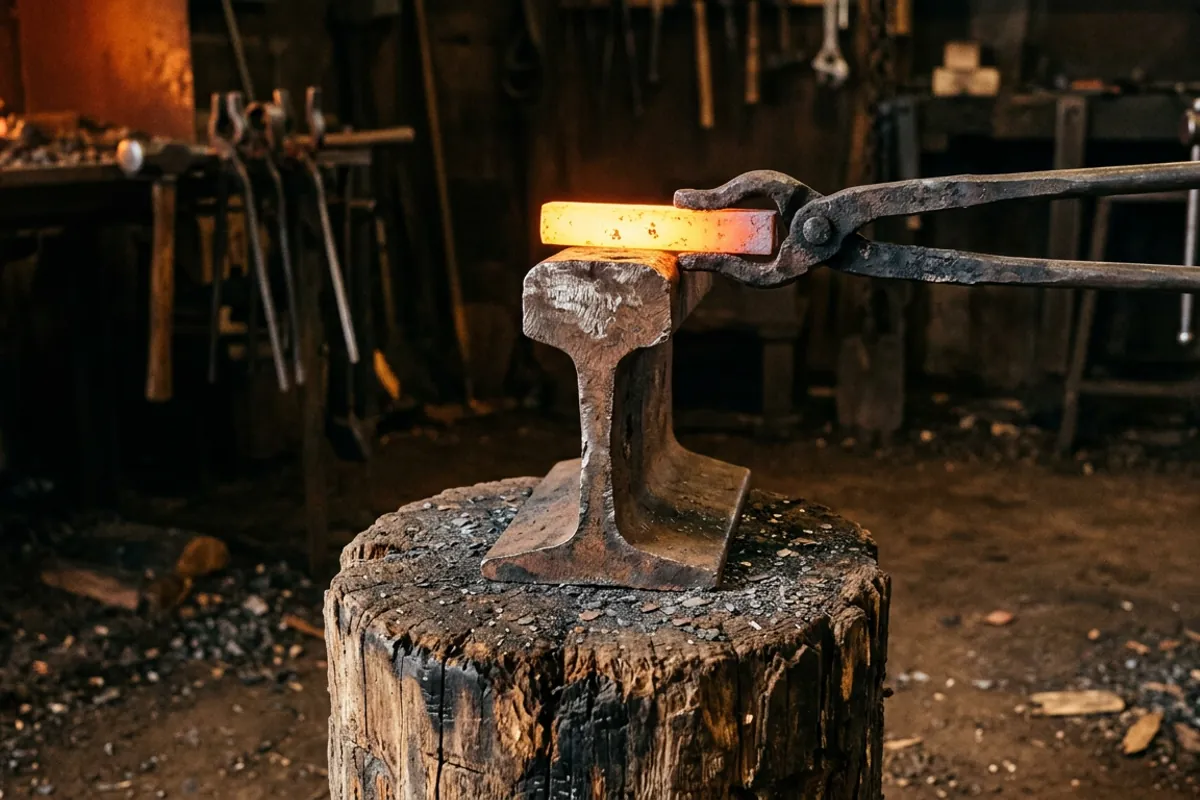
Laid flat, the way you see it in a hundred photos, it is a poor tool. anvilfire's assessment is blunt and correct: typical horizontal railroad rail anvils are miserable things, because they put no mass under the hammer blow and the narrow web makes them very springy. You are hammering on the head of the rail with nothing but a thin vertical web beneath it, and that web flexes. All the weight sitting off to the sides does you no good at all.
The fix is to turn the rail on end. As anvilfire puts it, to put mass under the hammer blow you turn the rail on end. Now the whole length of the rail is a column standing directly under your work, and every pound of it is doing something. They give the practical dimension too: a piece about 28 inches long, or a little over knuckle height, will weigh about 100 pounds. That is the piece you want.
Stood that way, anvilfire's own claim is that the 90 to 120 pounds of rail will react to your blows like a 200 to 300 pound anvil. That is their statement, not a measurement I have made, and I pass it along attributed. They also say that for forging up to about 3 inch bar stock the end of the rail is all you need. My own experience with rail on end matches the direction of that, if not the exact multiplier: it moves steel far better than the same rail lying down.
The working surface is the cut end, which means you get a small square face and no horn. You dress the cut flat, break the sharp edges slightly, and that is your anvil. If you want a horn and a hardy hole, that is what a stake anvil or a post vise is for, and you can run both alongside a rail perfectly happily.
One thing to check before you cut: anvilfire notes that much old used rail has flaws, shears and cold shuts, in the working surface. Look hard at the head and the cut face. A cold shut in the middle of your work surface is a crack waiting to open, and it will print into your steel every time you forge over it.
What rail steel actually is
Rail is high carbon steel, which is why it works at all.
For current North American production, the AREMA specification is tabulated in Nippon Steel's rails catalogue, and it is worth knowing what the modern spec calls for. Standard strength rail runs 0.74 to 0.86 percent carbon, 0.10 to 0.60 percent silicon, 0.75 to 1.25 percent manganese, with phosphorus and sulfur each capped at 0.020 percent. Tensile strength is 983 N/mm2 minimum and the specified Brinell hardness is 310. Intermediate strength rail is 0.72 to 0.82 percent carbon, 1014 N/mm2 minimum, Brinell 325. High strength rail runs the same 0.74 to 0.86 percent carbon with 1179 N/mm2 minimum and Brinell 370.
Those are the figures for new rail made to the current specification. I will not put a hardness number on the piece in your scrap pile, and you should not either. Salvaged rail is of unknown age and may well predate the spec above, it may have been made to a different standard entirely, and a century of service does things to a rail head. The rebound test on your actual piece tells you more about your actual piece than any published table does.
Two practical notes follow from the carbon content. First, if you are welding a rail anvil to a base, the only guidance I will give is anvilfire's: rail is often 75 point carbon steel and needs to be preheated prior to welding and cooled slowly after. That is the whole instruction. If that sentence does not mean anything to you yet, bolt or clamp the rail instead of welding it, or hand the weld to somebody who welds high carbon steel routinely.
Second, buy your rail. Scrap yards sell it, and rail suppliers sell short sections. Rail on an active line belongs to the railroad, taking it is theft, and being on live track is a way to get killed. There is no version of this where the free piece is worth it.
The sledge hammer anvil
A sledge hammer head bolted or set into a stump makes a surprisingly good small anvil, and it is my favorite of the improvised options after rail on end.
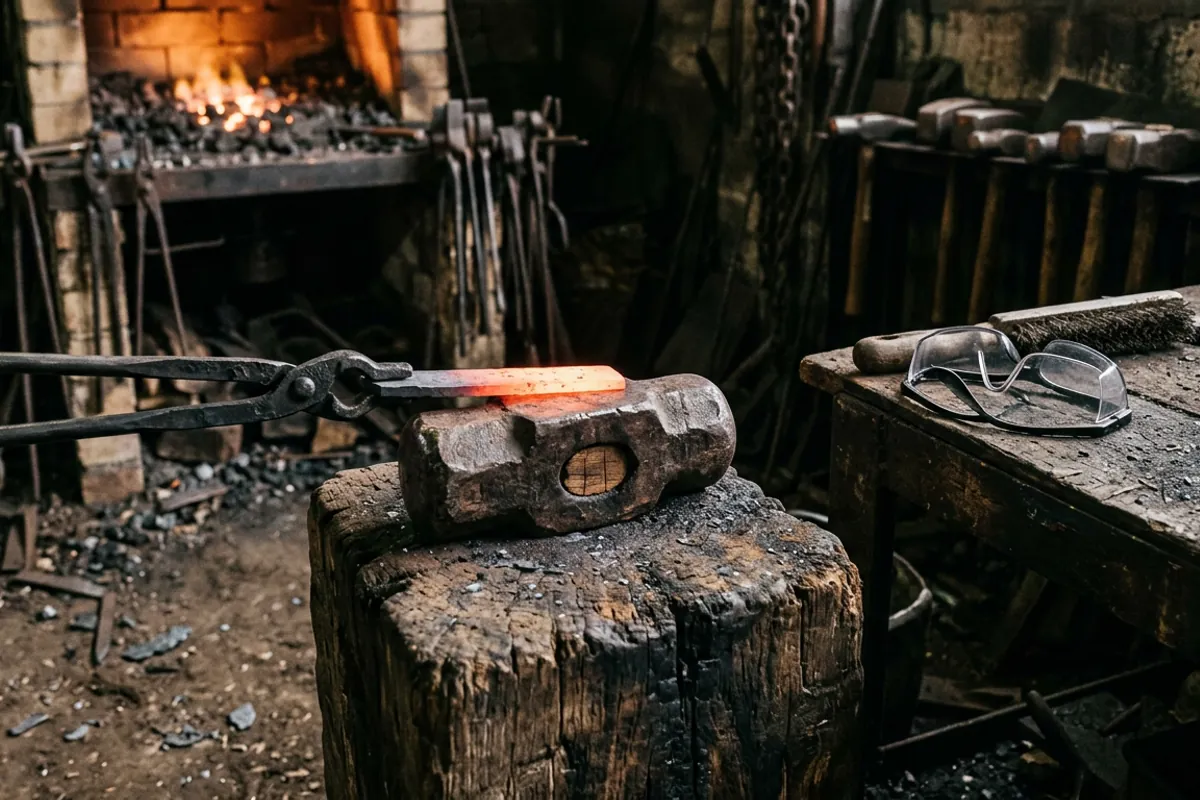
The reason is that a sledge head is already the right material. Council Tool, for example, publishes that its 8 lb DF sledge head is forged tool steel, made in USA, heat treated after machining for increased depth of hardness, and hardened to Rc 45 to 60 for safety and toughness, meeting or exceeding ASME B107.400-2018 Reaffirmed 2023. That is one maker's published figure for its own hammers, not a property of every head in a flea market bin, but it tells you what a purpose made sledge head is: a heat treated tool steel block with a flat face on it. That is more than most scrap yields.
The sledge hammer anvil is not a fringe idea either. anvilfire reports a comment from John N that in many parts of Asia swords and knives are forged on sledge hammer head anvils. I pass that along as reported, not as something I have watched.
Mount it face up, either with the head buried in a heavy stump so the timber grips the cheeks, or with the handle hole over a stub of steel or a snug wooden peg set in a block. The face is small, which is exactly the point for knife work and small scrolls, and useless for anything wide. A heavy head on a solid stump is a real tool for bladesmithing sized stock.
The hazard here is real and specific. You are hammering hardened steel with hardened steel, and hardened steel chips. anvilfire's rule that even good hammers should never strike an anvil face applies exactly the same to a sledge head standing in for the anvil. Keep your work between the two, dress any edge that starts to look bruised, and wear eye protection every single time.
The solid steel worth hunting for
If you have a scrap yard nearby, the best anvil alternative in the place is usually a plain block.
Large diameter round shafting stood on end, thick forging drops, a chunk of die block, a heavy steel press bolster: any solid piece of dense steel with a flat top and enough length to bury in a stand will forge. Judge candidates by the same two questions. Is the mass under the hammer, or off to the side? What does a ball bearing do when I drop it 10 inches onto the face?
Do not expect much from mild plate. The anvilfire number for A-36 plate 8 inches thick was 20 percent rebound, and that is with more thickness than you are likely to be handed. Mild steel will move hot steel because it has mass, but it dents, it dishes, and you will be flattening the top of it more often than you would like. It is a stopgap, not an anvil.
Forklift tines come up in every one of these conversations. Ask ten smiths and you will get ten confident and different answers about what tines are made of. I have not found a published grade or hardness I would repeat here, so I will not give you one. The owner consensus is that a tine standing on its heel makes a decent improvised anvil and that the flat leg makes a springy one, which is the same rail lesson wearing different clothes. Test the piece in front of you and believe the ball, not the folklore.
The alternatives that will waste your time
Cast iron anvils are the trap, and they are the reason this whole category has a bad name. anvilfire defines the term precisely: an ASO is an acronym for anvil shaped object, a junk anvil made of weak brittle cast iron or unheat treated material. They tested three farm store cast anvils and reported that all three had less rebound than the concrete floor they were sitting on. They also point out that the ledge cast into the side of these things, the one that mimics a forged anvil's top plate line, is there to make the uneducated buyer think it has a tool steel top plate. Their verdict on cast iron is that it is soft, brittle, will chip or break under normal use, and is worthless for forging because it is dead, with no rebound. I will not pretend one is fine for light work: it deforms, it returns nothing, and it can break. If you are weighing a cheap cast anvil against these alternatives, I have already argued that out in the cast iron anvil buying guide and the Harbor Freight anvil guide, and I would rather you read the reasoning there than repeat it here.
The metallurgy behind the chipping is worth one paragraph, because it explains why this is a material problem and not a manufacturing one. Work from the University of Cambridge by Yescas-Gonzalez and Bhadeshia describes cast irons as typically containing 2 to 4 weight percent carbon with high silicon concentrations and a greater concentration of impurities than steels, and notes that the graphite solidifies as interconnected flakes which act as stress concentrators, leading to poor toughness. The Metal Casting Institute classifies gray iron as a brittle material with less than 1 percent elongation, and points out that compared to common steel grades the carbon content in gray iron is about ten times higher. So the face is not just soft. It is laced with flake shaped stress risers that give a crack an easy path, which is why a corner lets go in a chunk rather than bending.
anvilfire's own quality ranking, top to bottom, is forged tool steel, then steel plate on a wrought body, then cast tool steel, then steel plate on cast iron, then hardened ductile iron, then chilled cast iron, and cast iron ASOs at the bottom. They also list I-beam anvils as not recommended, and the reason is the same one that sinks a flat rail: a thin web under a thin flange is a spring, not a mass.
Concrete and wood turn up in beginner videos. The anvilfire figures put smooth aged concrete at 15 percent rebound and a red oak endgrain log at 5 percent, both well under the 30 percent line where the test ball was leaving visible marks. A block of wood is a fine surface for straightening, dishing, and quiet work. It is not an anvil.
Mounting an improvised anvil so it actually works
Mass under the hammer only counts if it is coupled to the ground. A 100 lb rail sitting loose on a wobbling stand behaves like a much lighter anvil, because part of every blow goes into moving it.
Get the height right first. Standing with your arm hanging naturally, the face should land at about knuckle height for general forging, and it is fine to go a little lower if you are doing heavy drawing. anvilfire's 28 inch rail dimension is chosen for exactly this reason: cut it a little over knuckle height and the piece is its own stand.
Then get it tight. A hardwood stump with a socket chiseled to fit the rail or sledge head, sunk into the ground or set on a wide base, is still the best cheap answer. Bed the piece so it contacts wood on all sides, then strap, bolt, or wedge it so nothing rattles. If you are building a stand rather than digging a stump, the same principles apply as for a bought anvil, and I go through them in the anvil stand guide.
Loose is the failure mode to watch for. A rail that walks under the blow is dangerous as well as inefficient, and a sledge head that rocks in its socket is a projectile in waiting. Check the mount every few sessions.
Working safely at an improvised anvil
I am not going to call any of these safe, because none of them are. They are workable with attention.
Wear eye protection rated ANSI Z87.1 every time you pick up a hammer, without exception. Improvised anvils raise the chip risk above a proper anvil's: cut rail has sharp corners and possible cold shuts, a sledge face is hardened steel meeting hardened steel, and scrap of unknown history can have flaws you cannot see. Hardened steel that fails does not bend, it flies.
Never let your hammer strike the anvil face directly. That rule comes from anvilfire and it exists for good anvils; it matters more on an improvised one where you may not know what the surface will do. Keep hot steel between the hammer and the face.
Dress the edges. A sharp cut corner on a rail end will cut into your workpiece and can shear a flake off itself. Break the corners with a file or a grinder, wearing eye protection there too, and leave one edge slightly crisper if you need it for shouldering.
Natural fibers only near the forge. Cotton, wool, or leather. Synthetics melt into skin. That is not a preference and it never has been. The rest of the personal gear question is covered in the beginner's guide, and none of it changes just because your anvil was free.
When improvising stops paying
There is a point where the improvised anvil is costing you more than it saves, and it comes sooner than most people expect.
You have hit it when you find yourself avoiding operations. No horn means no smooth curves without a jig. No hardy hole means no bottom tools, so no hot cut, no fuller, no bending fork. A 3 inch square working face means every wide piece has to be worked in overlapping passes. When you notice you are choosing projects around your anvil's limits rather than around what you want to make, the anvil has become the bottleneck.
The other trigger is stock size. Rail on end covers small work well, and the wall you run into is width more than thickness. When you are regularly working stock too wide for the cut face, you want a real anvil under it.
The good news is that the used market is where the value is, and the money you did not spend on a cast anvil is a down payment on something with a hundred years left in it. I walk through what to look for, and what to walk away from, in the used anvils guide, and the broader anvil reference lives on the anvils topic hub. If you are building out the rest of the shop at the same time, the equipment guide is where I would start.
Until then, cut your rail long, stand it on end, drop a ball bearing on it, and go forge something. That is how I started, and it is still honest advice.