I have verified live listings and real sources. Writing the article now.
A blacksmith forge diy project is the cheapest honest way into heat, and for most beginners it is the build I steer them toward first. If you want the short version: I would build a small propane forge from a length of steel pipe or a scrapped freon tank, line it with one inch of ceramic fiber blanket, rigidize and coat that blanket with refractory, and feed it with a single naturally aspirated burner off an adjustable propane regulator. That is a weekend of work and a couple hundred dollars in parts, and it will forge everything a new smith needs to forge for the first two or three years.
Before you read another word, the honest framing this site runs on: I have run a propane forge and a coal forge in my own shop for years, so I can talk about how these fuels behave and what a forge needs to survive real use. But I have not bench tested every burner kit or blanket brand on the market. Where I name a specific product below, I am weighing published specs against what owners report on the forums, not pretending I ran each one down on my own bench. I will tell you which is which.
What a blacksmith forge diy build actually is
There is a fork in the road the moment you decide to build. You can build the whole thing, burner included, from black pipe and plumbing fittings. Or you can build the shell and the lining yourself and buy the one part that is genuinely fiddly to get right: the burner. Both are legitimate. I lean toward building the shell and lining and buying or carefully building the burner, because the shell is forgiving and the burner is not. A shell that is a little lumpy still forges fine. A burner that runs rich will soot up your work, waste gas, and never get to welding heat.
Understand what the forge is doing so the parts make sense. The steel shell is just a container. The ceramic fiber is the insulation that keeps the heat inside instead of in your shop. The refractory coating is the hard, heat reflective face that protects the fragile fiber and bounces radiant heat back at your steel. The burner mixes propane and air and throws a flame in. The regulator controls how hard. Get those five things right and you have a forge. Everything else is refinement.
If you are still deciding between propane and coal for a first fire, I wrote that out in full in my coal or propane first forge guide. For a diy build, propane is the easier and safer starting point, which is why the rest of this guide is a propane build. If your heart is set on solid fuel, my coal forge diy build covers that path, and the broader homemade forge build guide walks the whole shop decision.
The core parts, at a glance
Here are the parts I would buy for a single burner propane build, with the figures the makers and material references actually publish. Where a number is not published, I say so rather than invent one.
Scroll horizontally to see all columns.
| Part | Key spec | Material rating | Why it matters | Tier |
|---|---|---|---|---|
| Ceramic fiber blanket | 1 in x 12 in x 24 in, 8 lb density | rated to 2600 F | the insulation; one inch is enough for a small forge | Budget |
| Satanite refractory | dry mortar, mix with water | rated to 3200 F | hard hot face that protects the fiber | Budget |
| Adjustable propane regulator and hose | 0 to 30 PSI, gauge, braided hose | LP service | controls the burner; the safety heart of the build | Budget |
| Complete burner forge (buy option) | single burner, made in USA | not published | skip the burner build entirely | Mid |
Ceramic fiber blanket at these densities is a refractory ceramic fiber product, and the temperature ratings are published by the material makers and safety references rather than any one seller. See the material overview at Firebird's ceramic fiber safety guide for the ratings and the health handling, which I come back to below because it matters more than any spec on this page.
The shell: build this part, do not buy it
The shell is where a diy forge earns its name and saves your money. You do not need to buy anything for it. The two classic starting points are a length of heavy wall steel pipe, roughly six to eight inches inside diameter, or a scrapped R134 style refrigerant tank with the top cut off. Both are common, both are free or nearly free, and both give you a rounded interior, which is what you want. A round chamber reflects heat back on itself far better than a square box, and it is easier to line with blanket.
Keep the chamber small. This is the single most common beginner mistake, and it costs gas and heat for the life of the forge. A new smith almost always builds too big because a big forge feels more capable. It is the opposite. A small chamber gets to forging heat faster, holds it with less fuel, and reaches welding heat on one burner. The forum rule of thumb, which matches my own experience running propane, is roughly one three quarter inch burner for every 350 cubic inches of chamber volume. A six inch diameter by eight inch long chamber is about 226 cubic inches, comfortably inside one burner's reach. Do not build a chamber your single burner cannot keep hot.
Cut one or both ends open for stock to pass through, and cut the burner port at a slight tangent to the round wall, not straight at the center. That tangential angle sets the flame swirling around the chamber instead of blasting a hot spot on the opposite wall. A one inch or larger opening at each end lets you pass long stock and lets exhaust out. Leave a hard firebrick on the floor of the chamber as a sacrificial, replaceable forge floor. That brick takes the flux and the abuse so your lining does not.
Insulation and refractory, and the safety that comes with them
This is the part of a blacksmith forge diy build that people rush, and it is the part that will hurt you if you do. Line the inside of the shell with one inch of ceramic fiber blanket. For a small forge, one inch is plenty; two inches is better for a bigger chamber but eats interior volume. A common, well reviewed option is a 2600 F rated blanket in a one inch by twelve inch by twenty four inch piece, which is enough to line a small forge with some to spare. Check price on Amazon (paid link). I have not bench tested a specific brand's blanket, but the density and temperature rating are what you are buying, and the forum consensus is that any 8 pound, 2600 F blanket lines a hobby forge fine.
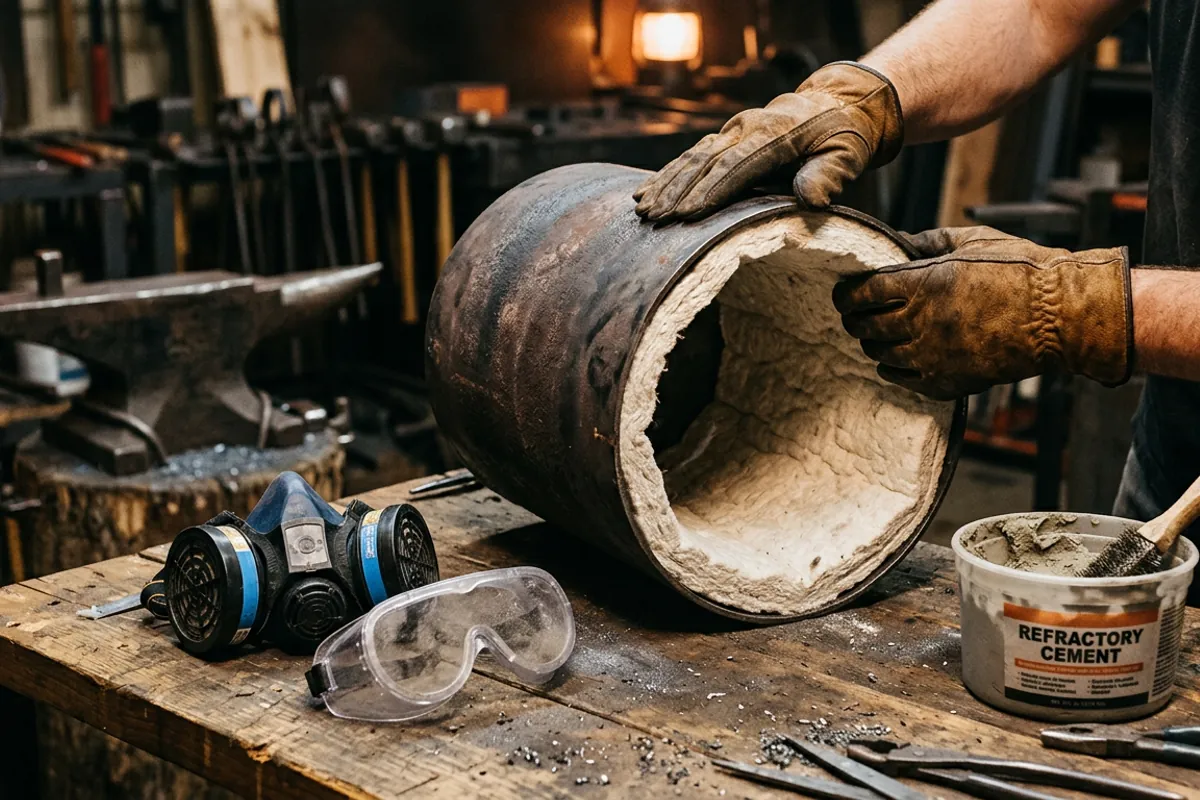
Now the part I will not soften. Raw ceramic fiber sheds fibers, and refractory ceramic fiber is classified as possibly carcinogenic to humans, Group 2B, on the strength of animal lung studies. That is not a reason to avoid it. It is a reason to handle it correctly. When you cut and fit blanket, wear a proper respirator with particulate filters, not a paper dust mask, plus goggles and gloves, and do it where the fibers cannot drift through your living space. The safety references and the material SDS both call for real respiratory protection during cutting and any later tear out. The Firebird ceramic fiber guide lays out why, and it is worth your ten minutes before you open the bag.
Once the blanket is fitted, you rigidize and coat it. Rigidizer soaks in and binds the surface fibers so they stop shedding, which is a health benefit before it is a durability one. Then you brush on a refractory mortar as the hard hot face. Satanite is the standard here, a dry mortar rated to 3200 F that you mix with water and paint on in thin coats, letting each dry before you fire it slowly. A four to five pound tub coats a small forge with margin. Check price on Amazon (paid link). Fire the first coats low and slow to drive off the water before you ever run the forge hot, or the trapped steam will spall your fresh lining right off the wall.
For the eye protection you will wear every time you look into that forge, and the rest of the shop PPE that is not optional, see my blacksmith safety gear guide. I lost my eyebrows to a cold oil quench early on because I stood too close with no face shield. I do not treat any of this as a formality, and neither should you.
The burner: build the Frosty T or buy one
The burner is where the whole build lives or dies, and it is the one part I would think hardest about. You have two honest paths.
Build it. The naturally aspirated burner most diy smiths land on is the Frosty T burner, a design worked out and documented on the I Forge Iron forums. It is a tee fitting, a length of black pipe as the mixing tube, and a MIG contact tip as the gas jet, and it needs no electricity or blower. It is genuinely buildable in an afternoon with hardware store parts, but it needs tuning: the jet has to be centered, the flame has to be set to neutral rather than rich, and getting there takes patience. The long running T burner tuning thread on I Forge Iron is the reference the community keeps pointing new builders back to, and it is where I would send you before you cut a single fitting. My propane burners for a forge guide covers the burner choices in more depth.
Buy it. If burner tuning sounds like more fuss than fun, there is no shame in buying the one hard part. A complete single burner propane forge that arrives lined and tuned, like the Hell's Forge single burner unit, gets you forging the day it lands, and you can still build your own bigger forge later once you understand what good heat feels like. Check price on Amazon (paid link). I have not run this exact unit, but owner reports on it are broadly positive for a first forge, with the usual note that the included regulator and the small chamber are entry level, not a shop's last forge. That matches what I would expect from the class.
Regulator, hose, and gas safety
Whatever burner you run, it feeds off a high pressure adjustable propane regulator, and this is not a place to improvise. You want an adjustable regulator with a 0 to 30 PSI range, a gauge so you can read what you are actually running, and a braided hose rated for LP service with the correct POL or QCC tank fitting. A fixed low pressure grill regulator will not give a forge burner enough gas to reach welding heat. Check price on Amazon (paid link).
Treat the gas side like the fuel line it is. Run the forge outdoors or in a space with real cross ventilation, never a closed garage, because a propane forge produces carbon monoxide. Leak check every fitting with soapy water before the first light, watching for bubbles. Keep the tank upright, out of the radiant heat, and well back from the forge. Have a way to shut the gas off fast that you can reach without leaning over the flame. None of this is exotic. It is the same discipline any propane appliance deserves, applied to a thing that runs a lot hotter.
What owners say
For the specific gear here, this is where I lean on the forums rather than a bench I do not have.
On burners, the I Forge Iron community strongly favors buildable naturally aspirated designs like the Frosty T, and the recurring theme in the T burner tuning thread is that the design works well but rewards careful jet alignment and patient tuning; a rich, roaring flame is the most common complaint and it is almost always a tuning problem, not a design one.
On complete diy builds, threads like the KnifeDogs propane forge build show the same arc over and over: builders start too big, learn that a smaller chamber heats faster on less gas, and end up happier with a modest single burner forge. That consensus lines up with my own experience, which is why I pushed the small chamber hard above.
On blanket and refractory, owner signal is consistent and unglamorous: any 8 pound 2600 F blanket lines a hobby forge fine, and the real differentiator is whether the builder rigidized and coated it properly. The complaints that show up are almost always skipped steps, a lining fired too fast and spalled, or fiber handled without a respirator, not a bad product.
What I would tell a friend
Build the shell, buy the burner if tuning is not your idea of fun, and never cut corners on two things: the respirator when you handle ceramic fiber, and the regulator and leak check on the gas side. Keep the chamber small, coat the lining and fire it slow, and put a firebrick on the floor to take the abuse. The one to skip is the oversized shell that looks impressive and eats gas forever.
If you would rather compare finished forges before you commit to building, the whole forges topic hub collects every forge guide on the site, and my propane forge buying guide covers the bought options. But for most beginners, a small propane forge you built with your own hands is the right first fire, and it will still be earning its keep as your second forge years from now.